Hey everyone! I know it's been a reeeeaaaaaally long time since I've updated, but the real reason is that I really just haven't been doing a whole lot of fishing over the winter.
I have, however, been tying a good bit, and will possibly have patterns to share if they're proven effective in the coming months. I have some pics of other flies I've been tying, though.
One of my new year's resolutions for my fly fishing is to gain proficiency tying and fishing the classic wet flies. To that end, my selection of floss has tripled (from the essential red for royal coachmen/wulff/trude/etc, and olive & orange for soft-hackles), my tinsel variety has exploded, and I'm checking out websites for things like duck skins, goose shoulders, and silk floss.
Tying these wets interests me for two reasons: first, its a style that isn't very forgiving of imperfections in your technique. Uneven underbody or bad proportion will make an otherwise perfect fly look very bad. Secondly, it's an aspect of fly fishing steeped in history and tradition that, with the advent of more popular flies and tactics (nymphs, emergers, etc), has has taken a backseat in terms of popularity with fishermen.
While I'm a long way from proficient, you can see some of my efforts below. More reading and more practice will, I'm sure, improve my skills, but this is where I am for now:
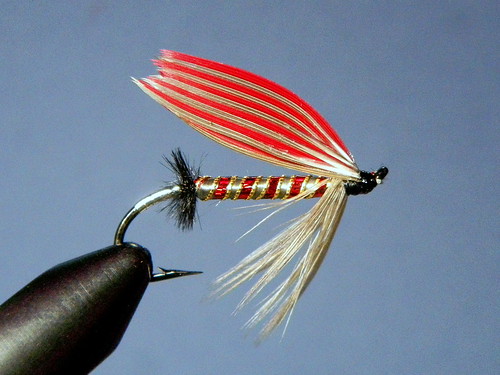
Ibis & White, Size 10, on Tiemco 5263
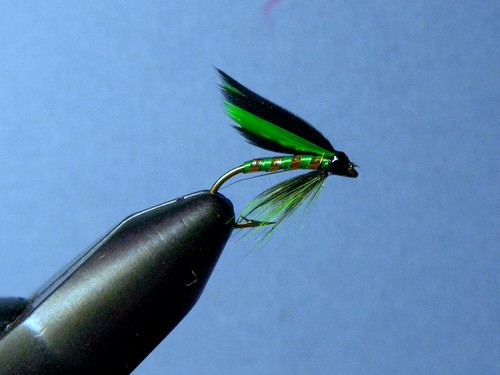
Green & Black Wet Fly on Mustad 3399A, Size 12
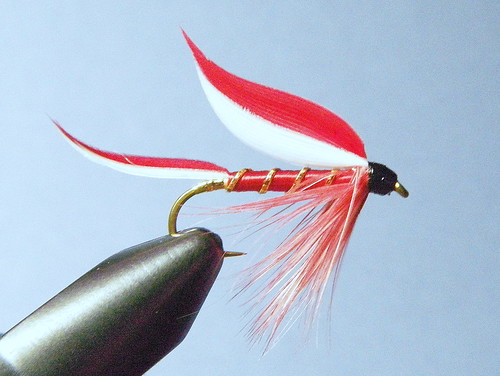
Wet Fly tied on Mustad 36890, Size 8
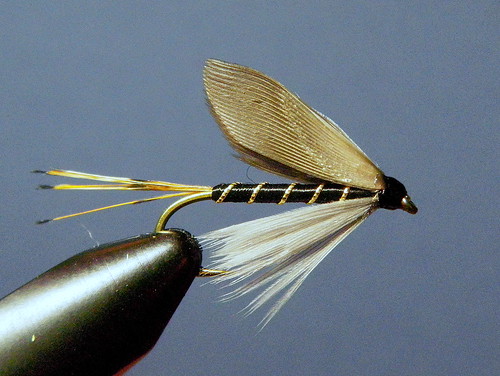
Blae & Black, tied on Tiemco 5263, Size 10
This is a fly that always seems to get a little extra attention when you show someone your fly box. I've even had far more experienced fly fishers and tyers look at a box with a few laser flies in it and make a comment specifically about this fly. I think its so eye catching because its simple but also unique, blurring the lines between an egg and a streamer in some sizes and colors...an impressive feat.
Sorry about the truly horrendous image quality. I took roughly triple the amount of shots seen here and the force wasn't strong with me. Maybe I'll try again soon and replace the shots, but for now, they give you a decent visual aid as to what's going on. Just pretend that Monet does my visuals. 
Anyway, here it is:
Laser Fly
Materials:
Hook: Mustad 36890, Size 8
Thread: 8/o Uni-thread, black
Tail: Laser Tail
Body: Laser yarn, usually 2 colors

Instructions:
1. Place hook in vise, start thread, and move to roughly the midpoint of the shank.

2. Tie in laser tail, then untwist fibers. You can rub the fibers between your fingers to “fluff them out”.

3. Start tying in small pinches of laser yarn at the midpoint of the shank. The key here is to keep the bulk at the shank to a minimum. Use only two wraps per pinch of thread tied down. Try to minimize the amount of laser yarn in front of your tie down point. Basically, get a little bit of laser yarn, do two wraps, then pull the laser yarn away from the fly. The fibers that were tied down will become part of the body, and the loose fibers will be pulled free.

4. Continue tying in small clumps of laser yarn immediately in front of the previous one, forming a body as you progress toward the eye. Smaller clumps will actually make for a fuller body, as tying in a large clump will greatly increase bulk, as well as the wraps needed to secure it. Keep the amounts tied in small, and tie in as many small clumps as you can by moving forward slowly. Each tie-in should be only two wraps of thread, on top of one another, and not take up much space.

5. When you are almost close enough to the eye to finish the fly, switch colors, to a contrasting color, and tie in 2-5 pinches of that color using the same method as before. At this point, if there are unruly fibers projecting out over the eye, trim them as close to your thread wraps as you can. Whip finish, cement if desired, and stroke back the fibers.

The finished fly.
This one is actually a bit fuller than I normally like to tie them, preferring a body more like the size of just the gold portion, but with the red stripe incorporated. The fly's creator felt that the second color was a necessary part of the fly. I agree, noting how much the contrast enhances the appearance. With a good selection of laser yarn, the color combinations are nearly endless. Also, there is a great deal of customization that may take place from this basic platform. As I mentioned before, changing the tailing material would be a common variation. In addition, you could add a set of hourglass eyes, a hackle or marabou collar, egg veil, a floss or tinsel tail wrap, wire or tinsel rib, herl overwing, etc.
I hope you enjoyed this tutorial, and, if you can find some Laser yarn, I hope you'll give this pattern a try!
As always, please feel free to leave your questions and comments about this fly and the tutorial itself.
This is just an update in my
review of the Vibram FiveFingers KSO shoes that I posted yesterday.
I finally got a few hours to spare in this unbelievably busy week, so I hit the stream to see what the trout were up to. I'd originally planned to just put on a pair of hip boots that I keep in my car at all times for just such an occasion, but then decided that it'd be a great opportunity to try out my KSOs (that I had on), in the water.
So, once I got to the stream (in this case, the Loyalhanna), I simply strung up my rod (Diamondglass 7'-0" 4wt), rolled up my jeans, and headed for the water.
The first thing I noticed was that the water was cold!
The second thing I noticed was the unbelievable amount of feeling the FiveFingers offered as I walked around the freestone streambed. Far better than the Teva sandals I normally use to wet wade, and obviously leaps and bounds better than hip boots or wading boots, I could feel each and every pebble underfoot.
Whether because of the individual toe pockets, the flexible sole, the zigzag siping, or, more likely, a combination of the three, I found myself walking around in the water far more naturally. While wading in hip boots is normally a cause for abandoning all fishing and worrying about secure placement of each step, the FiveFingers seemed to find solid purchase anywhere my foot fell on the slick, rounded stones in the Loyalhanna, freeing up my concentration, and allowing me to fish as I moved.
The Loyalhanna, like most freestone streams, has few, if any, jagged stones in the streambottom, so I didnt have to worry about sharp portrusions jabbing me underfoot, and the seperate pockets allowed my toes to flare a bit, increasing my footing in the silty sand that covers slower portions of the stream.
When I was ready to head home (or rather, when I had to tear myself away from fishing and head back to the busy schedule), it was nice to have such good traction for navigating up the bank in wet shoes. This, however, proved to be the only drawback of the FiveFingers that I've encountered so far: several times, I picked up stems of weeds and blades of grass between my toes. While it wasn't a huge issue, you definitely cant just bust through the weeds like you're used to doing with rubber hip boots.
When I got back to the car, I took off the shoes to see if the KSOs really kept stuff out, and was pleasantly surprised. While there were a very few tiny bits of sand and leaf litter in each shoe, the total amount was insignificant. In each shoe, I could count the individual bits of 'stuff' that got in. There was about 10 grains of sand in each shoe. Not hardly enough to notice. Overally, I was highly impressed, as I thought the elastic around the ankle would keep largers bits out, but allow silt to get all through the inside of the shoe. Nice job there, Vibram.
Back at the car, I took off my KSOs, dried my feet, and put on a pair of regular shoes, tossing the Vibrams behind my seat to dry. This was at about 6:30pm. Now, in the mean time, they were in my car, not in a normal airflow situation, but this morning they were still a little bit damp, something to consider if you plan on wearing them as an everyday shoe, or in extremely wet surroundings. I'm sure while being worn they'd dry much quicker.
By the way...I had one take on a #22 snowshoe caddis that I didn't get a good hookset on, and caught a nice healthy brown male on a #12 olive wulff. I saw alot of caddis fluttering around, in the #16-#20 neighborhood, but didn't see any trout eating any caddis. My guess is that standard caddis patterns will become effective very soon, and will remain effective until the first good frost.
...this IS a fishing blog, after all.